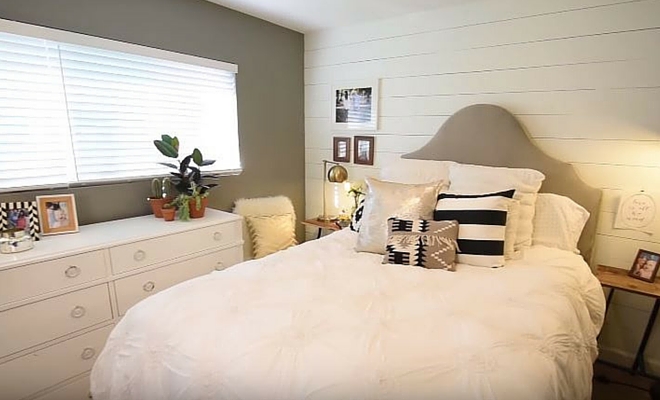
Want to make a whitewashed wood pallet accent wall for under $30? I have a tutorial that will give your room a totally new look!
DIY Wood Pallet Accent Wall For A Refreshing New Look
A whitewashed wood pallet wall will give your bedroom that beach cottage feel you’ve been dreaming of. The best part is, you don’t even have to stop with your bedroom. If you’re willing, you could even extend the wood pallet accent to your living room as well.
Here’s what you’ll need:
- Boards
- Screws
- Tape measure
- Power drill
- Sawzall
- Wood pallets
- Nail gun
- Nails
- Vacuum
- Water
- Water Based Paint
- Rag
- Paint brush
Step 1. Paint Wall
Some spaces in between the pallets will be seen, so it’s best to choose a color that’s relatively in the same color family of your pallets. For a whitewashed wall, I recommend going for a tan or beige color.
Step 2. Measure For The Frame

Putting a frame in will reduce the number of holes on your wall since you’ll only be drilling the frame. Begin by measuring on one edge of the wall. If you have a base board, start measuring from the top of your base board to the ceiling. In addition, you’d also want to measure and mark every single foot from the edge of the wall. If you have a window, measure from the baseboard to the bottom window frame. Don’t forget to measure above the window frame to the ceiling as well.
Step 3. Place Frame
Drill a small wooden board on one edge of the wall. If you have a level, set the level right against the wall to make sure each board is placed nice and straight. Continue to drill the boards on the foot long markings.
Step 4. Disassemble Pallets

After making sure your pallets are safe, start disassembling them. You can choose either a sawzall, a crowbar or a hammer for this job. If you have a sawzall, I suggest using it because it will definitely make the job both easier and faster.
Step 5. Nail Pallets In

Starting from the bottom, place your pallet board on a horizontal and use your nail gun to set it in place. You can also use your level in this step to ensure the pallets are straight. Keep doing this from the bottom going up. For a more rustic feel, line your boards in a way that the ends aren’t in the same place with the level above and below.
Step 6. Vacuum Pallets
Vacuuming the pallet boards will get rid of any debris or excess dirt. It’s very important to do this before you begin whitewashing your pallet boards.
Step 7. Paint Pallets

Mix one part of your water based paint with water. Grab a rag, dip it in some water, and dampen your wood pallet. Once the pallet is wet, take a brush, dip it in your paint and water mixture, and brush it over the pallet. Keep doing this until you paint the entire pallet. When you’re done, let the pallet dry and see if you’re happy with the result. If you are, continue painting the rest of the boards.
Step 8. Create A Whitewash Effect

For a whitewash effect, you can choose the colors of white and turquoise. You can also vary the amount of paint you put on the walls so that some areas would still show the faint colors of the wood pallets underneath.

Press play to watch the full tutorial of a wood pallet accent wall:
Block off an afternoon to make your wood pallet accent wall and be a step closer to creating the bedroom of your dreams. At below $30, it’s amazing how much you can save with this DIY project. I can’t wait to hear how your wall turns out!
Give a shoutout over at the comments section if you tried and loved this wood pallet tutorial!
Want more ways to decorate your room? Check out our hacks for decorating without painting over your wall!
Follow us on Facebook, Twitter, Instagram, and Pinterest!
Editor’s Note – This post was originally published in May 2016 and has been updated for quality and relevancy.
Originally posted on February 24, 2017 @ 1:40 AM


0 Responses