If you have your eye on interior trends, you know that floating shelves are one of the most popular additions to any home and room. They’re versatile, space-saving pieces you can even build and install yourself. Learning how to build floating shelves doesn’t take a professional! If you’re due for a room refresh or want to join the floating shelves trend, read on and learn how to build floating shelves.
How To Build Floating Shelves In 4 Simple Steps
Make This Trendy and Functional Addition To Any Room
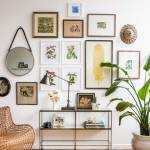
Floating shelves started out as a modern shelving idea. But these days, even the most classic and traditional homes have them. I’ve seen a lot of different floating shelves in all sorts of colors and designs, but today I want to share with you a trendy and chic floating shelf idea! I’ll be showing you how to build floating shelves with added leather straps. If you can learn how to build floating shelves like this, they’ll be perfect for a boho or eclectic homes! These are also compact and trendy enough for a dorm room or apartment. So keep scrolling and see how to build floating shelves with a touch of style!
Here’s what you’ll need to learn how to build floating shelves:

- A Planks of 1×4 Wood, Cut into 2 pieces 17″ long
- Wood Stain in your preferred shade
- Staining Pad
- Polyurethane Varnish
- 2 Long Belts, similar length
- Scissors
- ¾” Nails
- A Hammer
Step 1: Stain the wood

Use a staining pad to wipe the stain into the wood planks. Let dry, then put polyurethane varnish to give it some shine. Let dry for 24 Hours.
Step 2: Prepare the belts

Cup the buckles and buckle holes off, and make sure the 2 belts are the same length. Cut both of them in half.
Step 3: Nail the belts to the shelves

Use 2 straps per wood plank. Make sure the straps are aligned properly to each other. One side of the leather strap will be flushed to the wall, and the other side will be angled. Hold the leather strap in place, and then nail it on the underside of the wood. Do this for the other plank.
Step 4: Nail the shelves to the wall

Use a pencil to mark where you want to hang your shelves. Then, hammer a nail through the leather belt and into the wall. Do this for the other side, and the other plank.
And you’re done!

Watch the full tutorial right here:
Wasn’t learning how to build floating shelves so easy? Now all you have to do is accessorize with your favorite decor! I’m making more than one, that’s for sure!
Want more shelving ideas? Check out these ideas for your garage! Do you know how to build floating shelves in other styles or designs? Leave me a comment and let me know!
Originally posted on December 1, 2016 @ 3:31 AM


0 Responses